concept
Kubenete Concepts
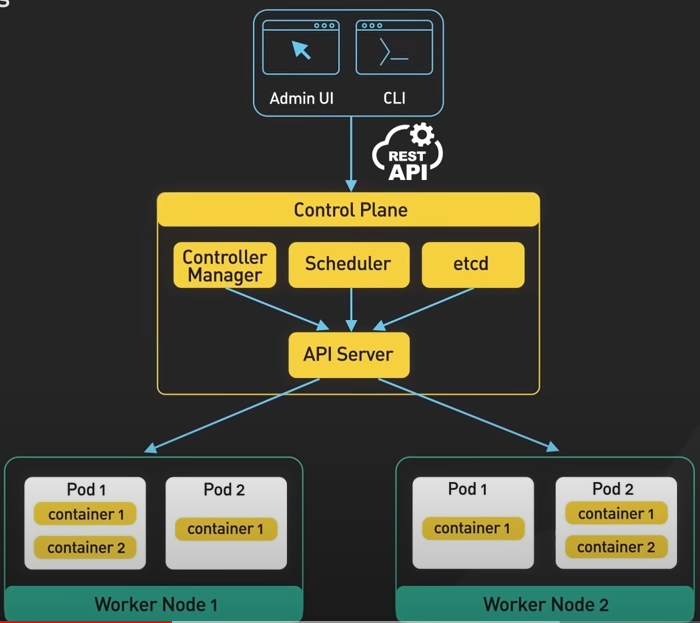
| Concept | Description |
|---|---|
| Control Plane | Responsible for the state of the cluster |
| Worker node | run the containerized application workloads |
| Pod | the smallest deployable units in Kubernetes |
| A pod hosts one or more containers, | |
| and provides shared storage and networking for them |
| Control Plane | Description |
|---|---|
| Controller Manager | running controllers that manage the state of the cluster |
ReplicationController, DeploymentController |
|
| Scheduler | Scheduling pods onto the worker nodes in the cluster |
| etcd | a distributed key-value store, stores the cluster's persistent state |
| API Server | primary interface between control plane & the rest of the cluster |
| Worker node | Description |
|---|---|
| kubelet | a daemon runs on each worker node, communicating with the control plane |
| receives the control plane about which pods to run on the node | |
| and ensures that the desired state of the pods is maintained | |
| kube-proxy | network proxy runs on each worker node, routing traffic to the correct |
| pods. provides load balancing for the pods & ensures the traffic is distributed | |
| evenly across the pods | |
| container runtime | runs the containers on the worker node, pulling image form registry, |
| start & stops a container & manage the container's resources |
Configuration Type
- All-in-One Single-Node Installation In this setup, all the control plane and worker components are installed and running on a single-node. While it is useful for learning, development, and testing, it is not recommended for production purposes.
- Single-Control Plane and Multi-Worker Installation In this setup, we have a single-control plane node running a stacked etcd instance. Multiple worker nodes can be managed by the control plane node.
- Single-Control Plane with Single-Node etcd, and Multi-Worker Installation In this setup, we have a single-control plane node with an external etcd instance. Multiple worker nodes can be managed by the control plane node.
- Multi-Control Plane and Multi-Worker Installation In this setup, we have multiple control plane nodes configured for High-Availability (HA), with each control plane node running a stacked etcd instance. The etcd instances are also configured in an HA etcd cluster and multiple worker nodes can be managed by the HA control plane.
- Multi-Control Plane with Multi-Node etcd, and Multi-Worker Installation In this setup, we have multiple control plane nodes configured in HA mode, with each control plane node paired with an external etcd instance. The external etcd instances are also configured in an HA etcd cluster, and multiple worker nodes can be managed by the HA control plane. This is the most advanced cluster configuration recommended for production environments.
Container Images
| Container Image | Supported Architectures |
|---|---|
| registry.k8s.io/kube-apiserver:v1.27.1 | amd64, arm, arm64, ppc64le, s390x |
| registry.k8s.io/kube-controller-manager:v1.27.1 | amd64, arm, arm64, ppc64le, s390x |
| registry.k8s.io/kube-proxy:v1.27.1 | amd64, arm, arm64, ppc64le, s390x |
| registry.k8s.io/kube-scheduler:v1.27.1 | amd64, arm, arm64, ppc64le, s390x |
| registry.k8s.io/conformance:v1.27.1 | amd64, arm, arm64, ppc64le, s390x |
Workloads
DeploymentandReplicaSet(replacing the legacy resource ReplicationController). Deployment is a good fit for managing a stateless application workload on your cluster, where any Pod in the Deployment is interchangeable and can be replaced if needed.StatefulSetlets you run one or more related Pods that do track state somehow. For example, if your workload records data persistently, you can run a StatefulSet that matches each Pod with aPersistentVolume. Your code, running in the Pods for that StatefulSet, can replicate data to other Pods in the same StatefulSet to improve overall resilience.DaemonSetdefines Pods that provide facilities that are local to nodes. Every time you add a node to your cluster that matches the specification in a DaemonSet, the control plane schedules a Pod for that DaemonSet onto the new node. Each pod in a DaemonSet performs a job similar to a system daemon on a classic Unix / POSIX server. A DaemonSet might be fundamental to the operation of your cluster, such as a plugin to run cluster networking, it might help you to manage the node, or it could provide optional behavior that enhances the container platform you are running.JobandCronJobprovide different ways to define tasks that run to completion and then stop. You can use a Job to define a task that runs to completion, just once. You can use a CronJob to run the same Job multiple times according a schedule.
Using Deployments
- The Deployment is the standard way for running containers in Kubernetes
- Deployments are responsible for starting Pods in a scalable way
- The Deployment resource uses a ReplicaSet to manage scalability
- Also, the Deployment offers the RollingUpdate feature to allow for zero-downtime application updates
- To start a Deployment the imperative way, use
kubectl create deploy ...
Understanding DaemonSets
- A DaemonSet is a resource that starts one application instance on each cluster node
- It is commonly used to start agents like the kube-proxy that need to be running on all cluster nodes
- It can also be used for user workloads
- If the DaemonSet needs to run on control-plane nodes, a toleration must be configured to allow the pods to run regardless of the contol-plane taints
- No replica and strategy on a DaemonSet
kubectl create deply daemon --image=nginx --dry-run=client -o yaml > daemon.yml
vim daemon.yml
# change kind to `DaemonSet`, remove replicas & strategy
kubectl apply -f daemon.yaml
kubectl get all
Using StatefulSet
- A stateless application is an application that doesn't store any session data
- Redirecting traffic in a stateless application is easy, the traffic can just be directed to another Pod instance
- Databases are an example of stateful applications, web services are stateless
- Even if stateful applications can be started by a Deployment, it's better to start it in a StatefulSet
- A StatefulSet provides guarantees about ordering and uniqueness of Pods
- It maintains a sticky identifier for each of the Pods it creates
- Pods in a StatefulSet are not interchangeable: each Pod has a persistent identifier that it maintains while being rescheduled
- The unique Pod identifiers make it easier to match existing volumes to replaced Pods
- Storage must be automatically provisioned by a persistent volume provisioner. Pre-provisioning is challenging, as volumes need to be dynamically added when new Pods are scheduled
- When a StatefulSet is deleted, associated volumes will not be deleted.
- A headless Service resource must be created in order to manage the network identity of Pods
- Pods are not guaranteed to be stopped while deleting a StatefulSet, and it is recommended to scale down to zero Pods before deleting the StatefulSet
# statefulset.yaml
apiVersion: v1
kind: Service
metadata:
  name: nginx
  labels:
    app: nginx
spec:
  ports:
  - port: 80
    name: web
  clusterIP: None
  selector:
    app: nginx
---
apiVersion: apps/v1
kind: StatefulSet
metadata:
  name: web
spec:
  selector:
    matchLabels:
      app: nginx # has to match .spec.template.metadata.labels
  serviceName: "nginx"
  replicas: 3 # by default is 1
  minReadySeconds: 10 # by default is 0
  template:
    metadata:
      labels:
        app: nginx # has to match .spec.selector.matchLabels
    spec:
      terminationGracePeriodSeconds: 10
      containers:
      - name: nginx
        image: registry.k8s.io/nginx-slim:0.24
        ports:
        - containerPort: 80
          name: web
        volumeMounts:
        - name: www
          mountPath: /usr/share/nginx/html
  volumeClaimTemplates:
  - metadata:
      name: www
    spec:
      accessModes: [ "ReadWriteOnce" ]
      storageClassName: "standard"
      resources:
        requests:
          storage: 1Gi
kubectl get storageclass
# standard
kubectl apply -f statefulset.yaml
Running individual Pods
Running individual Pods has disadvantages:
- No workload protection
- No load balancing
No zero-downtime application update
Use only individual Pods for testing, troubleshooting and analyzing
In all other cases, use Deployment, DaemonSet, or StatefulSet
Using Init containers
apiVersion: v1
kind: Pod
metadata:
  name: myapp-pod
  labels:
    app.kubernetes.io/name: MyApp
spec:
  containers:
  - name: myapp-container
    image: busybox:1.28
    command: ['sh', '-c', 'echo The app is running! && sleep 3600']
  initContainers:
  - name: init-myservice
    image: busybox:1.28
    command: ['sh', '-c', "until nslookup myservice.$(cat /var/run/secrets/kubernetes.io/serviceaccount/namespace).svc.cluster.local; do echo waiting for myservice; sleep 2; done"]
  - name: init-mydb
    image: busybox:1.28
    command: ['sh', '-c', "until nslookup mydb.$(cat /var/run/secrets/kubernetes.io/serviceaccount/namespace).svc.cluster.local; do echo waiting for mydb; sleep 2; done"]
---
apiVersion: v1
kind: Service
metadata:
  name: myservice
spec:
  ports:
  - protocol: TCP
    port: 80
    targetPort: 9376
---
apiVersion: v1
kind: Service
metadata:
  name: mydb
spec:
  ports:
  - protocol: TCP
    port: 80
    targetPort: 9377
Create ConfigMap
kubectl create configmap <map-name> <data-source>
## Create the local directory:
mkdir -p configure-pod-container/configmap/
# Download the sample files into `configure-pod-container/configmap/` directory
wget https://kubernetes.io/examples/configmap/game.properties -O configure-pod-container/configmap/game.properties
wget https://kubernetes.io/examples/configmap/ui.properties -O configure-pod-container/configmap/ui.properties
# use properties
kubectl create configmap game-config --from-file=configure-pod-container/configmap/
kubectl describe configmaps game-config
kubectl get configmaps game-config -o yaml
# use env file
kubectl create configmap game-config-env-file --from-env-file=kube/configmap/game-env-file.properties

## literal values
kubectl create configmap special-config --from-literal=special.how=very --from-literal=special.type=charm

## delete
kubectl delete configmap

## Define container environment variables with data from multiple ConfigMaps
kubectl create -f https://kubernetes.io/examples/configmap/configmaps.yaml
Create Secret
# use raw data
kubectl create secret generic db-user-pass \
    --from-literal=username=admin \
    --from-literal=password='S!B\*d$zDsb='
# use source files
kubectl create secret generic db-user-pass \
    --from-file=./username.txt \
    --from-file=./password.txt

kubectl get secret db-user-pass -o jsonpath='{.data}'

echo 'UyFCXCpkJHpEc2I9' | base64 --decode

# create a TLS Secret
kubectl create secret tls my-tls-secret \
  --cert=path/to/cert/file \
  --key=path/to/key/file
QoS class
- Guaranteed, For every Container in the Pod, the CPU limit must have & equal the CPU request
- Burstable, At least one Container in the Pod has a memory or CPU request or limit
- BestEffort, the Containers in the Pod must not have any memory or CPU limits or requests.
accessModes
ReadWriteOncewhich means the volume can be mounted as read-write by a single NodeReadWriteOncePodthe volume can be mounted as read-write by a single PodReadOnlyManythe volume can be mounted as read-only by many nodes.ReadWriteManythe volume can be mounted as read-write by many nodes.
Static Pods
- The kubelet systemd process is configured to run static Pods form the /etc/kubernets/manifests directory
- On the control node, static Pods are an essential part of how Kubernetes workds: systemd starts kubelet, and kubelet starts core Kubernetes services as static Pods
- Administrators can manually add static Pods if so desired, just copy a manifest file into /etc/kubernetes/manifests directory and the kubelete process will pick it up
- to mondify the path where Kubelet picks up the static Pods, edit staticPodPath in /var/lib/kubelet/config.yaml and use
sudo systemctl restart kubeletto restart - NEVER DO THIS ON THE CONTROL NODE!!
Static Pod use cases
- Static Pods are used to start the core Kubernetes services
- They can also be used to run agents, and by doing so you'll guarantee agent accessibility even if the API server is down
- Static Pods may be useful in cluster recovery scenarios as they can provide services while the API services are down.
kubectl run <staticpodname> --image=nginx --dry-run=client -o yaml > staticpod.yaml
sudo cp staticpod.yaml /etc/kubernetes/manifests/
kubectl get pods -o wide
Managing Node State
kubectl cordonis used to mark a node as unschedulablekubectl drainis used to mark a node as unschedulable and remove all running Pods from it- Pods that have been started from a DaemonSet will not be removed while using
kubectl drain, add--ignore-daemonsetsto ignore that - Add
--delete-emptydir-datato delete data from emptyDir Pod volumes - Use
kubectl uncordonto bring a node back in normal operational state - While using
cordonordrain, a taint is set on the nodes - A taint is a restriction that prevents Pods from running or being scheduled on a node
Managing Node Services
- The container runtime (often containerd) and kubelet are managed by the Linux systemcd service manager
- Use
systemctl status kubeletto check the current status of the kubelet - Notice that Pods that are scheduled on a node show as container processes in
ps auxoutput. Don't use Linux tools to manage Pods!
ps aux | grep kubelet
ps aux | grep containerd
systemctl status kubelet
sudo systemctl stop kubelet
sudo systemctl start kubelet
Scaling Applications
# kubectl scale is used to manually scale Deployment, ReplicaSet, or StatefulSet
kubectl scale deployment myapp --replicas=3
# Alternatively HorizontalPodAutoscaler(HPA) can be used
kubectl autoscale deployment myapp --min=5 --max=10
# HPA is an API resource that manages autoscaling of workloads, it works based on usage statistics that have been gathered by the metrics server
kubectl get hpa

## Demo: Configuring HorizontalPodAutoscaler
# 部署 metrics-server(HPA 依赖它采集 CPU/内存指标)
kubectl apply -f https://github.com/kubernetes-sigs/metrics-server/releases/latest/download/components.yaml
# 编辑 metrics-server,添加启动参数 --kubelet-insecure-tls=true(跳过 kubelet 证书校验,实验环境用)
kubectl edit -n kube-system deploy metrics-server
# 查看各 Pod 的资源使用情况,确认 metrics-server 生效
kubectl top pods
# 创建用于压测的 Deployment
kubectl create deploy webstress --image=nginx
# 配置 HPA:CPU 超过 80% 时扩容,副本数在 2~5 之间
kubectl autoscale deploy webstress --min=2 --max=5 --cpu-percent=80
# 查看 HPA 状态
kubectl get hpa
# 查看 Deployment 副本变化
kubectl get deploy webstress
behavior:
  scaleDown:
    stabilizationWindowSeconds: 300
    policies:
    - type: Percent
      value: 100
      periodSeconds: 15
  scaleUp:
    stabilizationWindowSeconds: 0
    policies:
    - type: Percent
      value: 100
      periodSeconds: 15
    - type: Pods
      value: 4
      periodSeconds: 15
    selectPolicy: Max
# /etc/kubernetes/manifests/kube-controller-manager.yaml
spec:
  containers:
  - command:
    - kube-controller-manager
    - --horiontal-pod-autoscaler-downscale-delay=30s
Understanding Multi-container Pods
- As a Pod should be created for each specific task, running single-container Pods is the standard
- In some cases, an additional container is needed to modify or present data generated by the main container
- Specific use cases are defined:
- Sidecar: provides additional functionality to the main container
- Ambassador: is used as a proxy to connect containers externally
- Adapter: is used to standardize or normalize main container output
- Since Kubernetes 1.29, an init container that has its
restartPolicyset toAlwaysis also referred to as a Sidecar container
How to Setup a Sidecar Container for Logging
- Create a Pod that runs Busybox with a command that writes "hello from the cluster" to a file with the name
/messages/index.html - Configure this Pod with an emptyDir type shared volume that is mounted on the directory
/messages - Add a sidecar container to this Pod, that runs Nginx and mounts the shared volume on
/usr/lib/nginx/html/ - Expose the Pod in such a way that users can access the file presented by the Nginx webserver by addressing a port that is externally exposed on your Kubernetes nodes
# sidecar.yaml
apiVersion: v1
kind: Pod
metadata:
  name: sidecar
spec:
  containers:
  - image: busybox
    name: test-container
    volumeMounts:
    - mountPath: /messages
      name: cache-volume
    args:
    - sh
    - -c
    - echo hello > /messages/index.html
  - image: nginx
    name: whatever
    volumeMounts:
    - mountPath: /usr/lib/nginx/html
      name: cache-volume
  volumes:
  - name: cache-volume
    emptyDir:
      sizeLimit: 500Mi
Managing Scheduling
Understanding Scheduling
- Kube-scheduler takes care of finding a node to schedule new Pods
- Nodes are filtered according to specific requirements that may be set:
- Resource requirements
- Affinity and anti-affinity
- Taints and tolerations and more
- The scheduler first finds feasible nodes then scores them; it then picks the node with the highest score
- Once this node is found, the scheduler notifies the API server in a process called binding
- If anything goes wrong in this phase, the Pod will show as Pending, or show an Error status
From Scheduler to Kubelet
- Once the scheduler decision has been made, it is picked up by the kubelet
- The kubelet will instruct the CRI to fetch the image of the required container
- After fetching the image and storing it on that specific node, the container is created and started
Setting Node Preferences
- The
nodeSelectorfield in thepod.specspecifies a key-value pair that must match a label which is set on nodes that are eligible to run the Pod - Use
kubectl label nodes worker1 disktype=ssdto set the label on a node - Use
nodeSelector: disktype: ssdin thepod.specto match the Pod to the specific node nodeNameis part of thepod.specand can be used to always run a Pod on a node with a specific name- Not recommended: if that node is not currently available; the Pod will never run
Understanding Affinity and Anti-Affinity
- (Anti-)Affinity is used to define advanced scheduler rules
- Node affinity is used to constrain a node that can receive a Pod by matching labels of these nodes
- Inter-Pod affinity constrains nodes to receive Pods by matching labels of existing Pods already running on that node
- Anti-affinity can only be applied between Pods
How it Works
- A Pod that has a
nodeAffinitylabel of key=value will only be scheduled to nodes with a matching label - A Pod that has a
podAffinitylabel of key=value will only be scheduled to nodes running Pods with the matching label
Setting Node Affinity
- To define node affinity, two different statements can be used
requiredDuringSchedulingIgnoredDuringExecutionrequires the node to meet the constraint that is definedpreferredDuringSchedulingIgnoredDuringExecutiondefines a soft affinity that is ignored if it cannot be fulfilled- While using
preferredDuringSchedulingIgnoredDuringExecution, a weight can be assigned to affinities to raise or lower priorities - At the moment, affinity is only applied while scheduling Pods, and cannot be used to change where Pods are already running
Defining Affinity Labels
- Affinity rules go beyond labels that use a key=value label
- A
matchExpressionis used to define a key (the label), an operator as well as optionally one or more values
affinity:
  nodeAffinity:
    requiredDuringSchedulingIgnoredDuringExecution:
      nodeSelectorTerms:
      - matchExpressions:
        - key: type
          operator: In
          values:
          - blue
          - green
- Matches any node where the key storage is defined:
nodeSelectorTerms:
- matchExpressions:
  - key: storage
    operator: Exists
# pod-with-node-affinity.yaml
apiVersion: v1
kind: Pod
metadata:
  name: with-node-affinity
spec:
  affinity:
    nodeAffinity:
      requiredDuringSchedulingIgnoredDuringExecution:
        nodeSelectorTerms:
        - matchExpressions:
          - key: kubernetes.io/e2e-az-name
            operator: In
            values:
            - e2e-az1
            - e2e-az2
      preferredDuringSchedulingIgnoredDuringExecution:
      - weight: 1
        preference:
          matchExpressions:
          - key: another-node-label-key
            operator: In
            values:
            - another-node-label-value
  containers:
  - name: with-node-affinity
    image: k8s.gcr.io/pause:2.0
# pod-with-node-antiaffinity.yaml
# kubectl label nodes node01 disktype=ssd
apiVersion: v1
kind: Pod
metadata:
  name: nginx
spec:
  affinity:
    nodeAffinity:
      requiredDuringSchedulingIgnoredDuringExecution:
        nodeSelectorTerms:
        - matchExpressions:
          - key: disktype
            operator: NotIn
            values:
            - ssd
  containers:
  - name: nginx
    image: nginx
    imagePullPolicy: IfNotPresent
# redis-with-pod-affinity.yaml
apiVersion: apps/v1
kind: Deployment
metadata:
  name: redis-cache
spec:
  selector:
    matchLabels:
      app: store
  replicas: 3
  template:
    metadata:
      labels:
        app: store
    spec:
      affinity:
        podAntiAffinity:
          requiredDuringSchedulingIgnoredDuringExecution:
          - labelSelector:
              matchExpressions:
              - key: app
                operator: In
                values:
                - store
            topologyKey: "kubernetes.io/hostname"
      containers:
      - name: redis-server
        image: redis:3.2-alpine
# web-with-pod-affinity.yaml
apiVersion: apps/v1
kind: Deployment
metadata:
  name: web-server
spec:
  selector:
    matchLabels:
      app: web-store
  replicas: 3
  template:
    metadata:
      labels:
        app: web-store
    spec:
      affinity:
        podAntiAffinity:
          requiredDuringSchedulingIgnoredDuringExecution:
          - labelSelector:
              matchExpressions:
              - key: app
                operator: In
                values:
                - web-store
            topologyKey: "kubernetes.io/hostname"
        podAffinity:
          requiredDuringSchedulingIgnoredDuringExecution:
          - labelSelector:
              matchExpressions:
              - key: app
                operator: In
                values:
                - store
            topologyKey: "kubernetes.io/hostname"
      containers:
      - name: web-app
Managing taints and tolerations
Understanding Taints
- Taints are applied to a node to mark that the node should not accept any Pod that doesn't tolerate the taint
Tolerationsare applied to Pods and allow (but do not require) Pods to schedule on nodes with matching Taints, so they are an exception to taints that are applied- Where
Affinitiesare used on Pods to attract them to specific nodes, Taints allow a node to repel a set of Pods - Taints and Tolerations are used to ensure Pods are not scheduled on inappropriate nodes, and thus make sure that dedicated nodes can be configured for dedicated tasks
Understanding Taint Types
- Three types of Taint can be applied:
NoSchedule: does not schedule new PodsPreferNoSchedule: does not schedule new Pods, unless there is no other optionNoExecute: migrates all Pods away from this node
- If the Pod has a toleration however, it will ignore the taint
Setting Taints
- Taints are set in different ways
- Control plane nodes automatically get taints that won't schedule user Pods
- When
kubectl drainandkubectl cordonare used, a taint is applied on the target node - Taints can be set automatically by the cluster when critical conditions arise, such as a node running out of disk space
- Administrators can use
kubectl taintto set taints:
# 添加污点
kubectl taint nodes worker1 key1=value1:NoSchedule
# 移除污点(末尾加 - 表示删除)
kubectl taint nodes worker1 key1=value1:NoSchedule-
Tolerations
- To allow a Pod to run on a node with a specific taint, a toleration can be used
- This is essential for running core Kubernetes Pods on the control plane nodes
- While creating taints and tolerations, a key and value are defined to allow for more specific access
kubectl taint nodes worker1 storage=ssd:NoSchedule
- This will allow a Pod to run if it has a toleration containing the key
storageand the valuessd - While defining a toleration, the Pod needs a key, operator, and value:
tolerations:
- key: "storage"
  operator: "Equal"
  value: "ssd"
- The default value for the operator is
Equal; as an alternative,Existsis commonly used - If the operator
Existsis used, the key should match the taint key and the value is ignored
Node Conditions and Automatic Taints
- Node conditions can automatically create taints on nodes if one of the following applies:
memory-pressuredisk-pressurepid-pressureunschedulablenetwork-unavailable
- If any of these conditions apply, a taint is automatically set
- Node conditions can be ignored by adding corresponding Pod tolerations
Taint & Toleration Demo
kubectl taint nodes worker1 storage=ssd:NoSchedule
kubectl describe nodes worker1
kubectl create deployment nginx-taint --image=nginx
kubectl scale deployment nginx-taint --replicas=3
kubectl get pods -o wide
kubectl create -f taint-toleration.yaml
kubectl create -f taint-toleration2.yaml
Understanding Quota
Quotais an API object that limits total resources available in a Namespace- If a Namespace is configured with Quota, applications in that Namespace must be configured with resource settings in
pod.spec.containers.resources - Where the goal of the
LimitRangeis to set default restrictions for each application running in a Namespace, the goal ofQuotais to define maximum resources that can be consumed within a Namespace by all applications
Understanding LimitRange
LimitRangeis an API object that limits resource usage per container or Pod in a Namespace- It uses three relevant options:
type: specifies whether it applies to Pods or containersdefaultRequest: the default resources the application will requestdefault: the maximum resources the application can use
Quota Demo
kubectl create quota qtest --hard pods=3,cpu=100m,memory=500Mi --namespace limited
kubectl describe quota --namespace limited
kubectl create deploy nginx --image=nginx:latest --replicas=3 -n limited
kubectl get all -n limited
kubectl describe rs/nginx-xxx -n limited
kubectl set resources deploy nginx --requests cpu=100m,memory=5Mi --limits cpu=200m,memory=20Mi -n limited
kubectl get pods -n limited
Understanding Scheduling Priorities
- By default, the kube-scheduler doesn't have any priorities
- If you want to determine the order in which Pods are scheduled and evicted when there are resource constraints, consider using the
PriorityClassresource - Each
PriorityClasshas a value, and adding a higher value to it gives it a higher priority - Pods need to be configured with a
priorityClassNameto use a certain PriorityClass - A PriorityClass can be set as
globalDefault, which means that Pods that don't have a specific PriorityClass set will schedule with this PriorityClass - When PriorityClass is used, and the cluster runs out of resources, low priority Pods will be evicted to make place for higher priority resources
- While creating a PriorityClass, the
preemptionPolicycan be set toNeverto ensure that Pods will never be evicted
PriorityClass Demo
kubectl create priorityclass high-priority --value=1000 --description="high priority" --preemption-policy="Never"
kubectl create priorityclass mid-priority --value=125 --description="mid priority" --global-default=true
kubectl run testpod --image=nginx
kubectl get pod testpod -o yaml | grep -B 2 -i priorityclass
kubectl create deploy highprio --image=nginx
kubectl edit deploy highprio
# spec.template.spec.priorityClassName: high-priority
Page Source