STM32H7S78-DK
The STM32H7S78-DK Discovery kit is a complete demonstration and development platform for the Arm® Cortex®-M7 core-based STM32H7S7L8H6H microcontroller.
Flash Memory
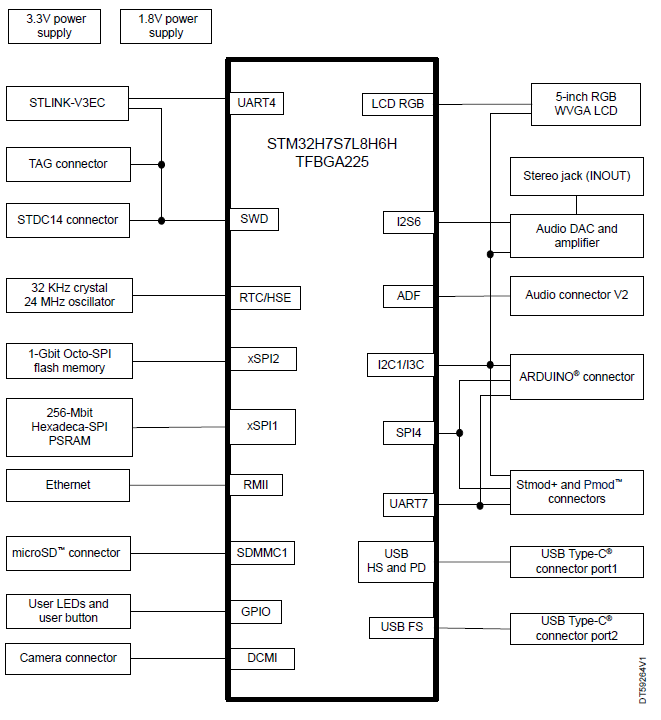
1 x 1-Gbit Octal-SPI NOR flash memory
RAM Memory
1 x 256-Mbit Hexadeca-SPI PSRAM
Connector
- 800 x 480 5-inch 800x480 TFT color LCD with capacitive touch panel
- 1 x Digital microphone
- 1 x Stereo Line OUT headset jack
The STM32H7S7L8H6H microcontroller features three I2C buses, six SPI ports, three USART ports, two SDMMC ports, two CAN ports, an Ethernet port, two SAI ports, two 12-bit ADCs, an embedded step-down converter, two Octo-SPI memory interfaces, one Hexadeca-SPI interface, USB OTG HS port with power delivery, LCD-TFT controller, flexible memory controller (FMC), 8- to 14-bit DCMI interface, JTAG, and SWD debugging support.
24 MHz Crystal Oscillator
Debug
- JTAG/SW 10-pin TAG probe TC2050-IDC-NL
- ST-Link USB-C
The STM32H7S78-DK Discovery kit integrates an STLINK-V3EC embedded in-circuit debugger and programmer for the STM32 MCU, with a USB Virtual COM port bridge and comes with the comprehensive MCU Package.
Getting start
- To identify correctly all device interfaces from the host PC, install the Discovery USB driver available on the STM32H7S78-DK webpage, before connecting to the board.
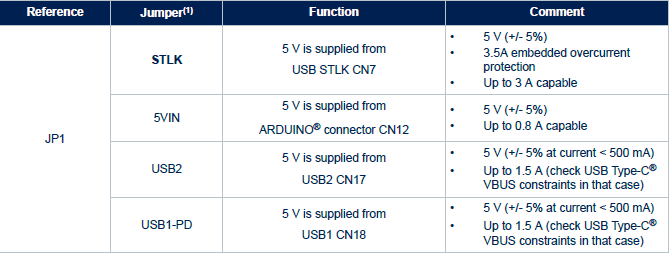
- Check that the jumper JP5 is ON and JP1 is set on STLK. Black switch SW1 is set to 0.
- Connect a USB Type-A or USB Type-C® to USB Type-C® cable (not included) from the STM32H7S78-DK Discovery board (CN7) to a PC to power the board. The LEDs LD10 (5V power), and LD7 (COM) light up.
- The LCD module displays a welcome menu, indicating the startup of the demonstration application software.
- The demonstration application software and its user manual, as well as other software examples for exploring STM32CubeH7RS features are available on the STM32H7S78-DK webpage.
- Set JP3 ON to keep STLINK-V3EC in reset mode. It is useful to reduce current consumption for user USB certifications.
ST-LINK driver installation and firmware upgrade (on Microsoft Windows)
- Download the latest ST-LINK driver.
- Extract the archive and run
dpinst_amd64.exe. Follow the displayed instructions. - Download the latest ST-LINK firmware upgrade.
- Extract the archive and run the
ST-LinkUpgrade.exeprogram. - Connect the board to your PC using a USB cable and wait until the USB enumeration is completed.
- In the ST-Link Upgrade program, press the Device Connect button.
- When the ST-LINK driver is correctly installed, the current ST-LINK version is displayed.
- Press the Yes >>>> button to start the firmware upgrade process.
Usuage Example
Hardware block diagram and board layout

Power source selection

Page Source