arduino
ARDUINO IOT EXPERIMENTS
IO Port Configuration (Embedded Software and Hardware Architecture)
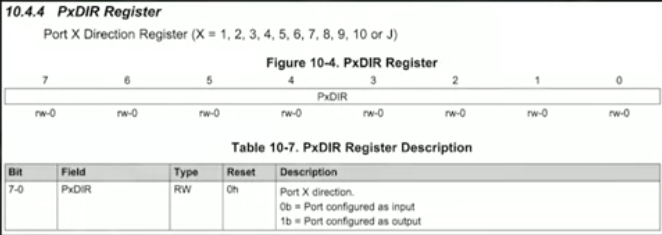
- Port Direction Register sets pin to:
- 0: an input
- 1: an output
- rw-O: Bit is Read/Write & defaults to 0
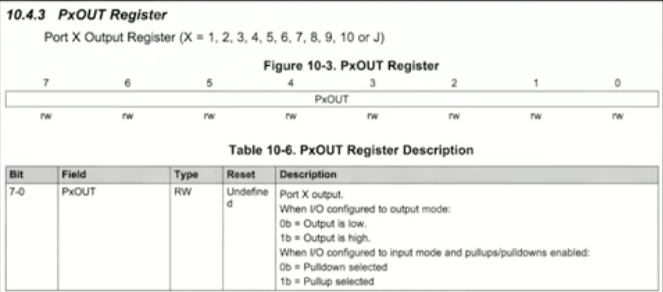
- Port Output Register sets output to:
- 0: Output set to LOW (GND)
- 1: Output set to HIGH (VCC)
#include <stdint.h>
#include "msp.h"

// MSP432 microcontroller
#define LENGHT1 (100000)
#define LENGTH2 (10000)
#define P1_OUT_REG (0x40004C02)
#define P1_DIR_REG (0x40004C04)
#define BIT0 (0x01)

void main(void)
{
  uint32_t i;
  uint8_t * p1_out = (uint8_t*)0x40004c02; /* pointer to port 1 output register */
  uint8_t * p1_dir = (uint8_t*)P1_DIR_REG; /* pointer to port 1 direction register */

  /* Stop watchdog timer */
  WDTCTL = WDTPW | WDTHOLD;

  /* Sturcture overlay: Configure P1.0 as output */
  // P1 -> DIR |= 0x01;
  /* Direct Dereference: Configure P1.0 as output */
  *p1_dir |= BIT0;
  while(1)
  {
    /* Direct Dereference: Set P1.0 HIGH */
    // P1 -> OUT |= BIT0;

    /* Structure Overlay: Toggle P1.0 */
    // P1 -> OUT ^= 0x01;
    /* Direct Dereference: Toggle P1.0 */
    *p1_out ^= BIT0;

    for (i = LENGHT1; i>0; i--); /* Delay */
  }
}
Special ports
- VIN 端口:VIN 是 input voltage 的缩写,表示有外部电源时的输入端口。
- AREF:Reference voltage for the analog inputs(模拟输入的基准电压)。使用 analogReference()命令调用。
- ICSP:也有称为 ISP(In System Programmer),就是一种线上即时烧录,目前比较新的芯片都支持这种烧录模式,包括大家常听说的 8051 系列的芯片,也都慢慢采用这种简便的烧录方式。我们都知道传统的烧录方式,都是将被烧录的芯片,从线路板上拔起,有的焊死在线路板上的芯片,还得先把芯片焊接下来才能烧录。为了解决这种问题,发明了 ICSP 线上即时烧录方式。只需要准备一条 R232 线(连接烧录器),以及一条连接烧录器与烧录芯片针脚的连接线就可以。电源的+5V,GND,两条负责传输烧录信息的针脚,再加上一个烧录电压针脚,这样就可以烧录了。
Sensor Experiments
- Analog Temperature Sensor
- Analog read serail
- Blink
- Dual-color LED
- Relay Module
- Button
- Buzzer
- Buzzer Passive
- Inclination
- Sound
- Fun with motor
- Step motor
- Infrared Receiver
- Vibration Switch
- Laser
- LCD 1602A I2C
- HC SR04
- Reliable transmission
- ESP 32
- RFID
- DS18B20 Temperature Sensor
- DHT11 Humidity
- BMP180 Barometer
- Water level
- DS1302
car experiments
- Advance
- Start
- Move
- Colorful move
- Tracking
- Tracking Ultrasonic
- Infrared Avoid
- Ultrasonic Avoid
- Infrared Remote
- Remote Control
iot experiments
type
booleancharbyteintunsigned intlongunsigned longfloatdoublestringarrayvoid
constants
- HIGHT | LOW (Digital IO Voltage)
- INPUT | OUTPUT (Digital IO Direction)
- true | false
functions
- Digital IO
pinMode(pin, mode)Digital INPUT/OUTPUT, pin = 0~13, mode = INPUT | OUTPUTdigitalWrite(pin, value)pin = 0~13, value = HIGH | LOWint digitalRead(pin)pin = 0~13
- Analog IO
int analogRead(pin)Analog IO, pin = 0~5analogWrite(pin, value)- PWM IO, pin = 3,6,9,10,11 value=0~255 改变 PWM 脚位的输出电压值, analogWrite(9,128); // 输出电压约 2.5 伏特
- Extended IO
shiftOut(dataPin, clockPin, bitOrder, value)SPI 外部 IO 扩展函数,通常使用带 SPI 接口的 74HC595 做 8 个 IO 扩展,dataPin 为数据口,clockPin 为时钟口,bitOrder 为数据传输方向(MSBFIRST 高位在前,LSBFIRST 低位在前),value 表示所要传送的数据(0 ~ 255),另外还需要一个 IO 口做 74HC595 的使能控制。unsigned long pulseIn(pin, value)脉冲长度记录函数,返回时间参数(us),pin 表示为 0 ~ 13,value 为 HIGH 或 LOW。比如 value 为 HIGH,那么当 pin 输入为高电平时,开始计时,当 pin 输入为低电平时,停止计时,然后返回该时间。
- Time
unsigned long millis()返回时间函数(单位 ms),该函数是指,当程序运行就开始计时并返回记录的参数,该参数溢出大概需要 50 天时间。delay(ms)delayMicroseconds(us)
- Math
min(x,y)max(x,y)abs(x)constrain(x, a, b)map(value, fromLow, fromHigh, toLow, toHigh)pow(base, exponent)sq(x)sqrt(x)sin(rad)cos(rad)tan(rad)
- Random
randomSeed(seed)随机数端口定义函数,seed 表示读模拟口analogRead(pin)函数long random(max)随机数函数,返回数据大于等于 0,小于 maxlong random(min, max)随机数函数,返回数据大于等于 min,小于 max
- Interrupts
attachInterrupt(interrupt, , mode)外部中断只能用到数字 IO 口 2 和 3,interrupt 表示中断口初始 0 或 1,表示一个功能函数,mode:LOW 低电平中断,CHANGE 有变化就中断,RISING 上升沿中断,FALLING 下降沿中断。detachInterrupt(interrupt)中断开关,interrupt=1 开,interrupt=0 关。interrupts()使能中断noInterrupts()禁止中断
- Serial
Serial.begin(speed)串口定义波特率函数,speed 表示波特率,如 9600,19200 等。int Serial.available()判断缓冲器状态。int Serial.read()读串口并返回收到参数。Serial.flush()清空缓冲器。Serial.print(data)串口输出数据。Serial.println(data)串口输出数据并带回车符。
main
/**
put your setup code here, to run once, to init
 */
void setup() {}

/**
put your main code here, to run repeatedly:
 */
void loop() {}
macos arduino IDE library path
/Users/<username>/Library/Arduino15/libraries
Platform arduino:avr@1.8.6 already installed
Already installed LiquidCrystal@1.0.7
Already installed Mouse@1.0.1
Already installed Arduino_BuiltIn@1.0.0
Already installed Ethernet@2.0.1
Already installed Stepper@1.1.3
Already installed Firmata@2.5.9
Already installed Keyboard@1.0.4
Downloading Servo@1.1.8
Servo@1.1.8
Installing Servo@1.1.8
Installed Servo@1.1.8
Downloading SD@1.2.4
SD@1.2.4
Installing SD@1.2.4
Installed SD@1.2.4
Downloading TFT@1.0.6
TFT@1.0.6
Installing TFT@1.0.6
Installed TFT@1.0.6
linux connection
ls -l /dev/ttyACM*
crw-rw---- 1 root dialout 188, 0 5 apr 23.01 ttyACM0
sudo usermod -a -G dialout <username>
Downloading packages
arduino:avr-gcc@7.3.0-atmel3.6.1-arduino7
arduino:avrdude@6.3.0-arduino17
arduino:arduinoOTA@1.3.0
arduino:avr@1.8.6
Installing arduino:avr-gcc@7.3.0-atmel3.6.1-arduino7
arduino:avr-gcc@7.3.0-atmel3.6.1-arduino7 installed
Installing arduino:avrdude@6.3.0-arduino17
arduino:avrdude@6.3.0-arduino17 installed
Installing arduino:arduinoOTA@1.3.0
arduino:arduinoOTA@1.3.0 installed
Installing platform arduino:avr@1.8.6
Configuring platform.
Platform arduino:avr@1.8.6 installed
Downloading Ethernet@2.0.1
Ethernet@2.0.1
Installing Ethernet@2.0.1
Installed Ethernet@2.0.1
Downloading Firmata@2.5.9
Firmata@2.5.9
Installing Firmata@2.5.9
Installed Firmata@2.5.9
Downloading Keyboard@1.0.4
Keyboard@1.0.4
Installing Keyboard@1.0.4
Installed Keyboard@1.0.4
Downloading LiquidCrystal@1.0.7
LiquidCrystal@1.0.7
Installing LiquidCrystal@1.0.7
Installed LiquidCrystal@1.0.7
Downloading Mouse@1.0.1
Mouse@1.0.1
Installing Mouse@1.0.1
Installed Mouse@1.0.1
Downloading Servo@1.1.8
Servo@1.1.8
Installing Servo@1.1.8
Installed Servo@1.1.8
Downloading Stepper@1.1.3
Stepper@1.1.3
Installing Stepper@1.1.3
Installed Stepper@1.1.3
Downloading Arduino_BuiltIn@1.0.0
Arduino_BuiltIn@1.0.0
Installing Arduino_BuiltIn@1.0.0
Installed Arduino_BuiltIn@1.0.0
Downloading SD@1.2.4
SD@1.2.4
Installing SD@1.2.4
Installed SD@1.2.4
Downloading TFT@1.0.6
TFT@1.0.6
Installing TFT@1.0.6
Installed TFT@1.0.6
Windows 11 connection
Downloading packages
arduino:avr-gcc@7.3.0-atmel3.6.1-arduino7
arduino:avrdude@6.3.0-arduino17
arduino:arduinoOTA@1.3.0
arduino:avr@1.8.6
Installing arduino:avr-gcc@7.3.0-atmel3.6.1-arduino7
Configuring tool.
arduino:avr-gcc@7.3.0-atmel3.6.1-arduino7 installed
Installing arduino:avrdude@6.3.0-arduino17
Configuring tool.
arduino:avrdude@6.3.0-arduino17 installed
Installing arduino:arduinoOTA@1.3.0
Configuring tool.
arduino:arduinoOTA@1.3.0 installed
Installing platform arduino:avr@1.8.6
Configuring platform.
Platform arduino:avr@1.8.6 installed
Downloading Arduino_BuiltIn@1.0.0
Arduino_BuiltIn@1.0.0
Installing Arduino_BuiltIn@1.0.0
Installed Arduino_BuiltIn@1.0.0
Downloading Ethernet@2.0.2
Ethernet@2.0.2
Installing Ethernet@2.0.2
Installed Ethernet@2.0.2
Downloading Mouse@1.0.1
Mouse@1.0.1
Installing Mouse@1.0.1
Installed Mouse@1.0.1
Downloading TFT@1.0.6
TFT@1.0.6
Installing TFT@1.0.6
Installed TFT@1.0.6
Downloading Keyboard@1.0.4
Keyboard@1.0.4
Installing Keyboard@1.0.4
Installed Keyboard@1.0.4
Downloading LiquidCrystal@1.0.7
LiquidCrystal@1.0.7
Installing LiquidCrystal@1.0.7
Installed LiquidCrystal@1.0.7
Downloading Stepper@1.1.3
Stepper@1.1.3
Installing Stepper@1.1.3
Installed Stepper@1.1.3
Downloading Firmata@2.5.9
Firmata@2.5.9
Installing Firmata@2.5.9
Installed Firmata@2.5.9
Downloading SD@1.2.4
SD@1.2.4
Installing SD@1.2.4
Installed SD@1.2.4
Downloading Servo@1.1.8
Servo@1.1.8
Installing Servo@1.1.8
Installed Servo@1.1.8
Page Source